Field Deployment
After you've configured your study, added the necessary data sources, and programmed the Surveys and Matrix Reasoning tests, you are ready to enroll participants and collect data. In this section, we'll cover the important checks before enrolling participants and provide some tips for field deployment.
Test Before Deploy
Avicenna provides countless features, each having a high level of flexibility, and you need to make sure the configuration you have set is exactly what you intended. So it's very important that after you finish designing your study in Avicenna and before the field deployment, you test the study to ensure all components behave as expected.
As a rule of thumb, you should test the following aspects of the study before the field deployment:
- Is the Participation Period for each participant correctly configured?
- Have you included all the data sources you need for the study? Are there any missing or extra data sources? Also, what does the data collected from each data source look like?
- Is the flow of each survey correct? Are skip patterns configured as you intended?
- Have you configured the Triggering Logics for each survey correctly? Are time-triggered Surveys, or proximity-triggered Surveys prompted at the right time?
We suggest conducting the test in two phases. First, after completing the design of the first draft of the study, test the study by yourself. This allows you to tweak different components, and test it again right away on your phone. After you are sure the study works as you expect, you can conduct the second phase of testing by inviting your friends, and colleagues to join your study as dummy participants. This allows you to mock a complete field deployment and pinpoint any minor adjustments missing from your first round of tests.
Test Accounts
As a researcher, you probably have a Researcher account with Avicenna which you use to create and manage your study. Avicenna does not allow Researchers to join a study as a participant. You should create another account as a Participant, using a different email address, and use that to test your study.
Ideally, you use your professional email address for your Researcher account and your personal email address for your Participant account. You may also decide to use email aliases, such as + postfix instead.
During the test and as you make changes to the study, it's good practice to drop
the participant and do your test again. You can do that using the
Drop From Study
option on the Participation page. This option does not remove the
participant's account. So you can use these credentials again. But it removes
the participation record and any data associated with this. So you can join your
study again as if it's the first time.
Test Participation Period
In the previous section, we discussed how you can set Start Time and
End Time to instruct Avicenna how long each participant should be part of your
study. If you want to make sure the values you have chosen for these parameters
are correct, use your Participant account to register in your study, and then
check out the calculated Start and End Time that Avicenna has assigned to you.
To do so, select your study in My Studies, navigate to the Participation page,
and check the participants' Start Time and End Time.
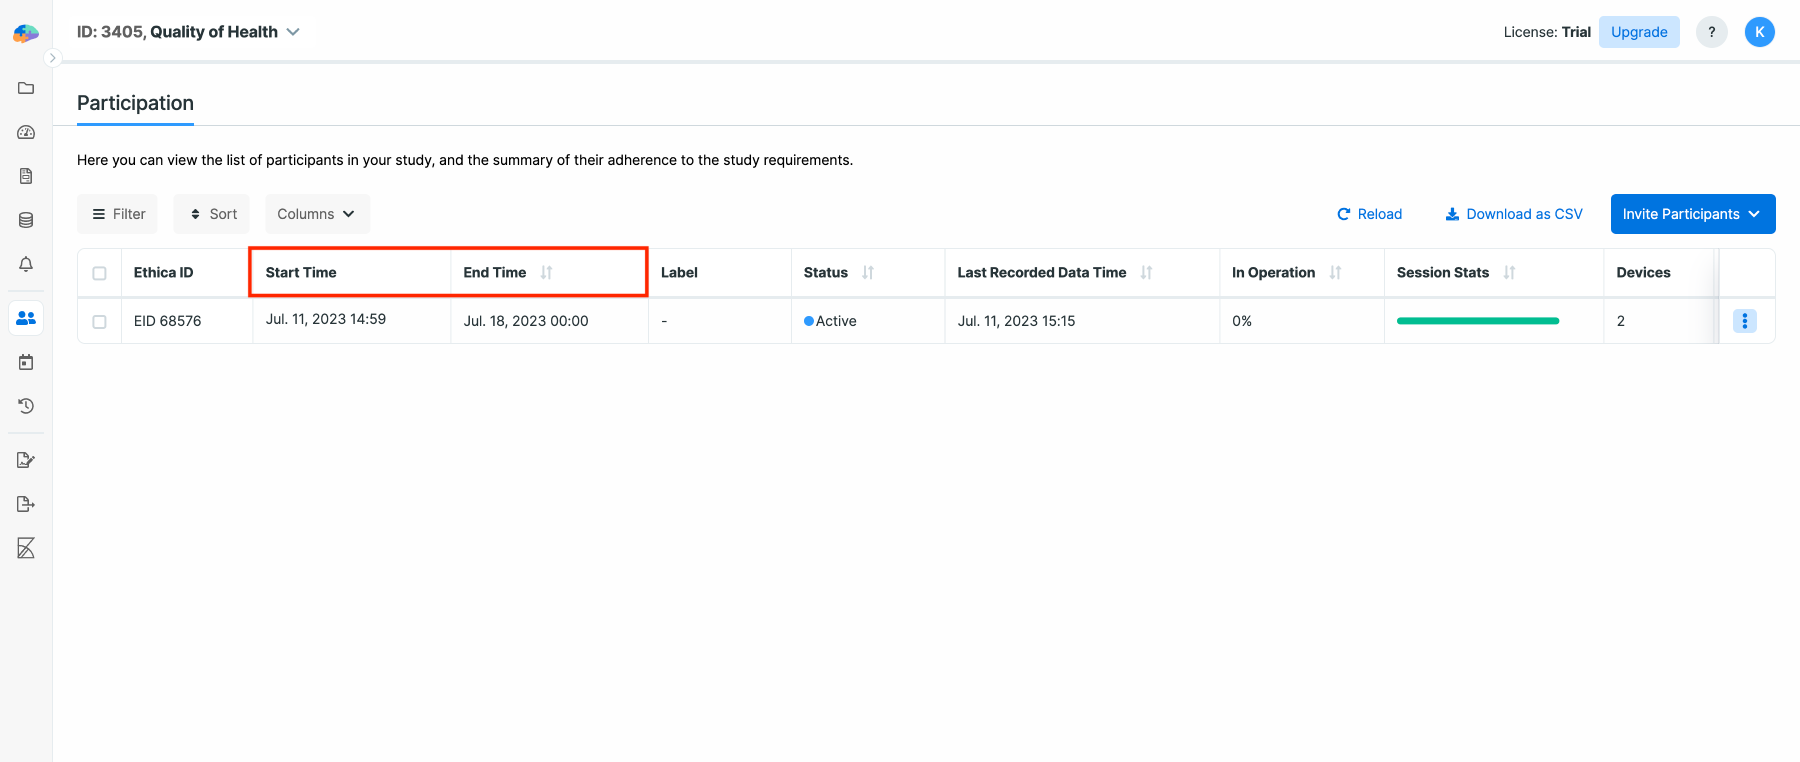
The Start Time and End Time fields show the values you are looking for. In
the above example, our first participant will be part of the study from
2023-06-11 to 2023-06-18. All Activity sessions (e.g., Surveys, or Matrix
Reasoning tests) and sensor-based data collection from this participant will
happen within this period, and no data will be collected before or after this
time window.
Test Data Sources
While collecting data from the data sources you have chosen is done fully automatically, it's important to test a few things about them before the field deployment.
First, you should make yourself familiar with the setup and permission requirements for each of the data sources in your study. Some data sources work without any explicit permission from the participant such as raw motion sensors. Others require the participant to give explicit permission to Avicenna to access the data, for example, GPS. Some other data sources may require the participant to install another Avicenna application on their phone for the data to be collected.
Participants have to do these setups once immediately after they join your study. They do not need to repeat these unless they explicitly revoke permission to switch to a new device. The Avicenna app will walk them through the steps needed for each configuration:
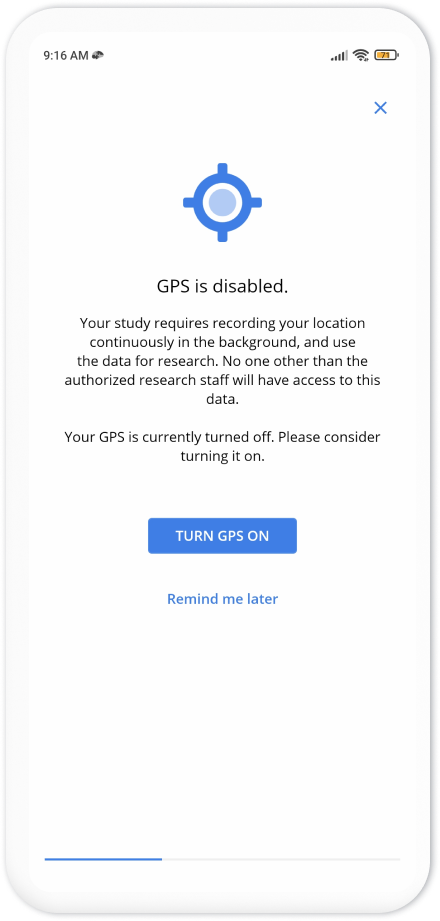
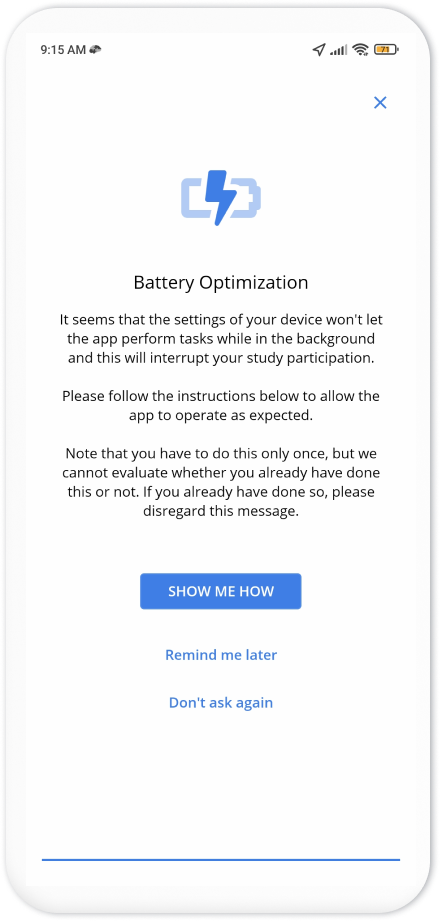
When you join your study as a mock participant, you will be able to check out all these steps. This allows you to better guide your participants during the enrollment session, in case they have any questions.
Second, you need to check the data collected from each data source, and how they look like. To do so, you need to remain in the study for a few hours or even days so enough data is being collected. Then you can go to your Researcher Dashboard and check out the data collected from your participant account. In the next section, you can read more about how you can access the data in the Researcher Dashboard.
Test Survey Flow
Avicenna Activity Editor allows you to preview the survey and test how it will
work on the participants' devices. To do so, go to the Preview & Publish page
of the Activity Editor. The Preview tab there allows you to quickly test your
survey flow.
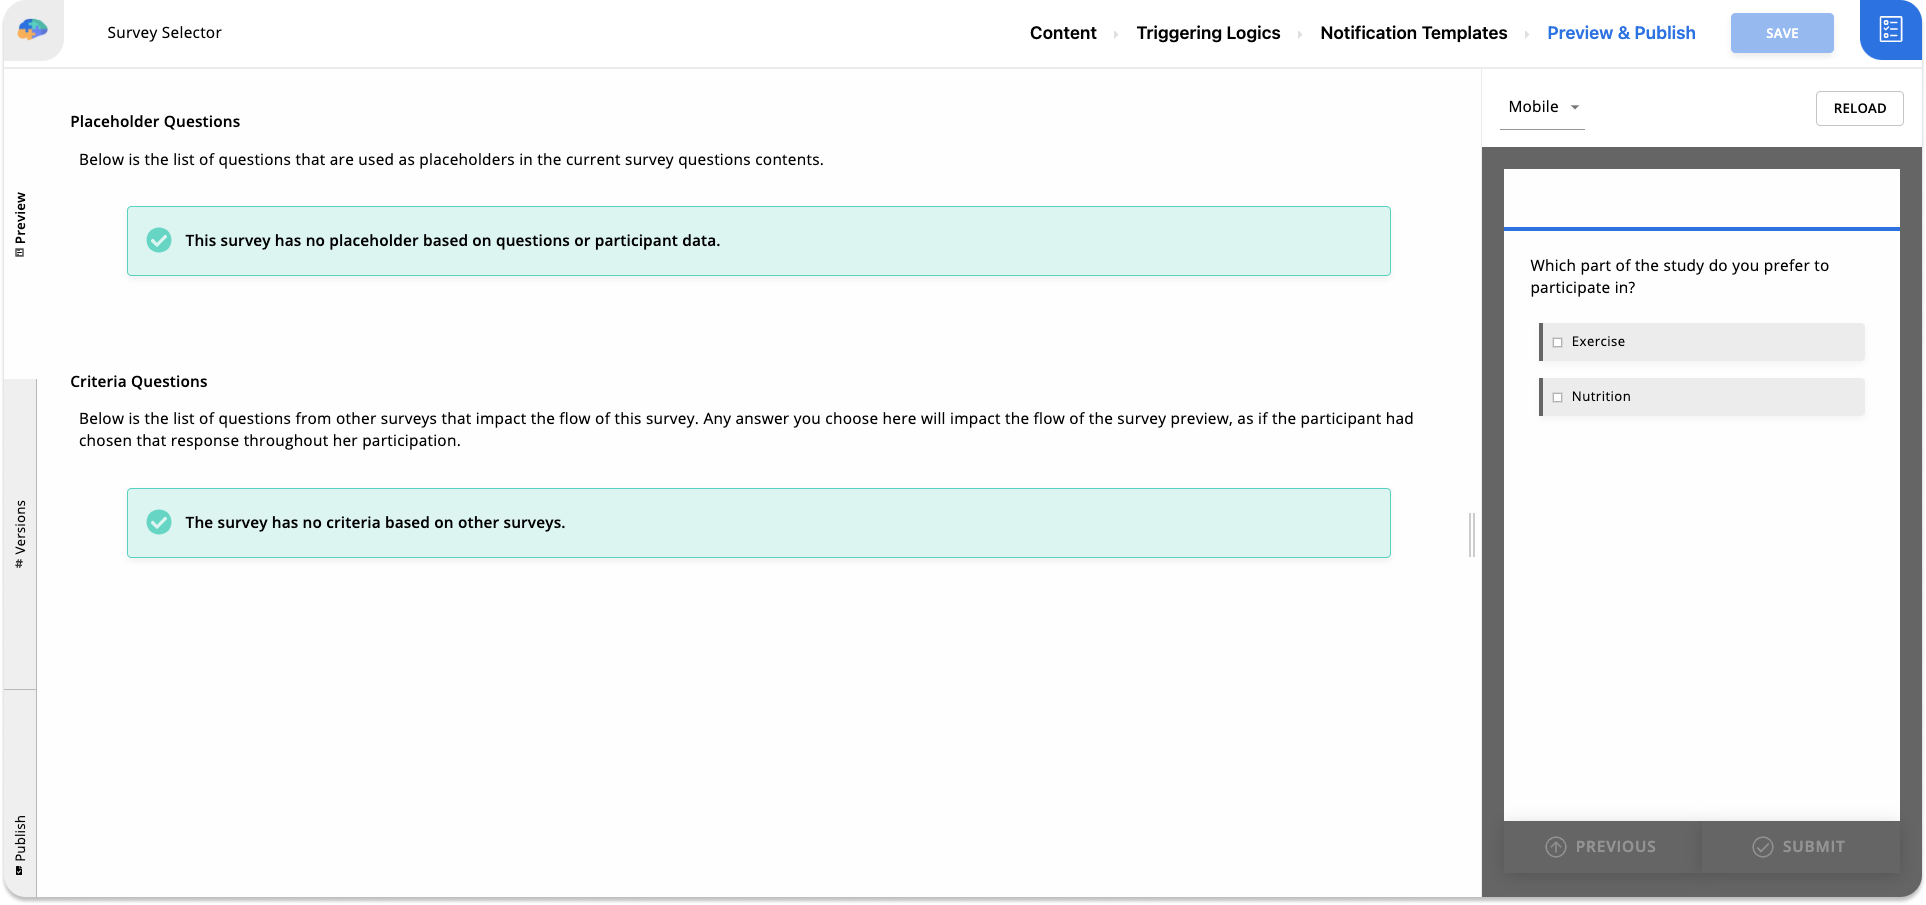
While Survey Preview gives you an overall feeling about your survey flow, it's important to test the flow on a smartphone. If possible, we suggest testing it on all platforms that your participants may use: Android, iPhone, and/or the web. This way you can be sure the content and the flow of your survey are properly programmed.
The challenge is using specific Triggering Logics and instructing your survey to be prompted at a certain time based on either proximity or any other contextual Triggering Logics. In this case, when you join the study as a participant, you have to wait for a while before the Avicenna app prompts your survey for you to test it. This gets even worse when you have multiple Surveys, each with different Criteria, where the Criteria impact the Triggering Logics. Testing this can easily get very complex.
The ideal solution is to first test the flow of the survey, and then test the Triggering Logics separately, as explained below. To test the flow of the survey, simply add a User Triggering Logic to each of your Surveys. This way, you instruct Avicenna to add a button to the app's home screen for each of your Surveys. Using the survey's triggering button, you can initiate the survey as many times as needed.
The following image shows how the home screen of the Avicenna app looks like after we added a User Triggering Logic to each of the four survey activities we created for our demo study.
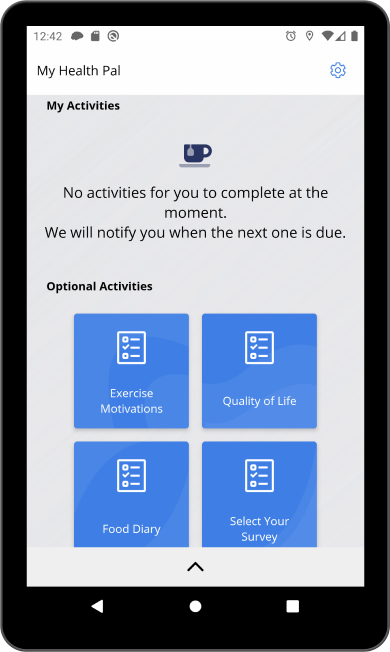
This way, you can launch each survey as many times as needed, even Surveys that are supposed to be prompted at certain conditions. When you have tested the flow of the survey and are happy with how questions are presented and how the skip patterns and branchings work, you can remove all User Triggering logics you had added for testing.
Test Triggering Logic
In addition to the flow of your survey, you also need to make sure each survey is triggered exactly at the intended time. Avicenna offers different Triggering Logics you can use throughout your study. Here we discuss how you can test each type.
User Triggering Logics
Surveys with User Triggering Logic are simple to test. Avicenna should present a button on the homepage of the app, and tapping on that button should open the intended survey.
Time Triggering Logic
When you assign a Time Triggering Logic to a survey, you instruct Avicenna to notify participants based on a certain schedule and ask them to complete the survey. In this case, it's very important to make sure the defined schedule is exactly what you had in mind. Such a schedule can be as simple as every day at 9 am or as complex as if the participant is female, on Mon., Wed., and Fri. between 6 to 7 pm.
When a new participant joins your study, for each survey with Time Triggering Logic, Avicenna generates the timetable for survey prompts and uses that to prompt the survey. You can check that timetable right after the participant registers in your study, to ensure the generated survey prompt times are what you expect.
To do so, from the Researcher Dashboard, select your study and navigate to the
Sessions page. There, you can select one or more participants, and one or more
Surveys, and check all sessions for that survey. If a session was expected to be
prompted in the past, Avicenna will also display whether the participant responded
to it, canceled it, or the survey was expired. If the survey session is in the
future, you can check when the survey is expected to be prompted.
The following image shows the participant who has registered in our demo study. We configured our "Quality of Health" survey to be prompted once a day at 11 am. You can see that the timetable below shows the first survey session was prompted on March 6th, the second session will be prompted on March 7th, and so on.
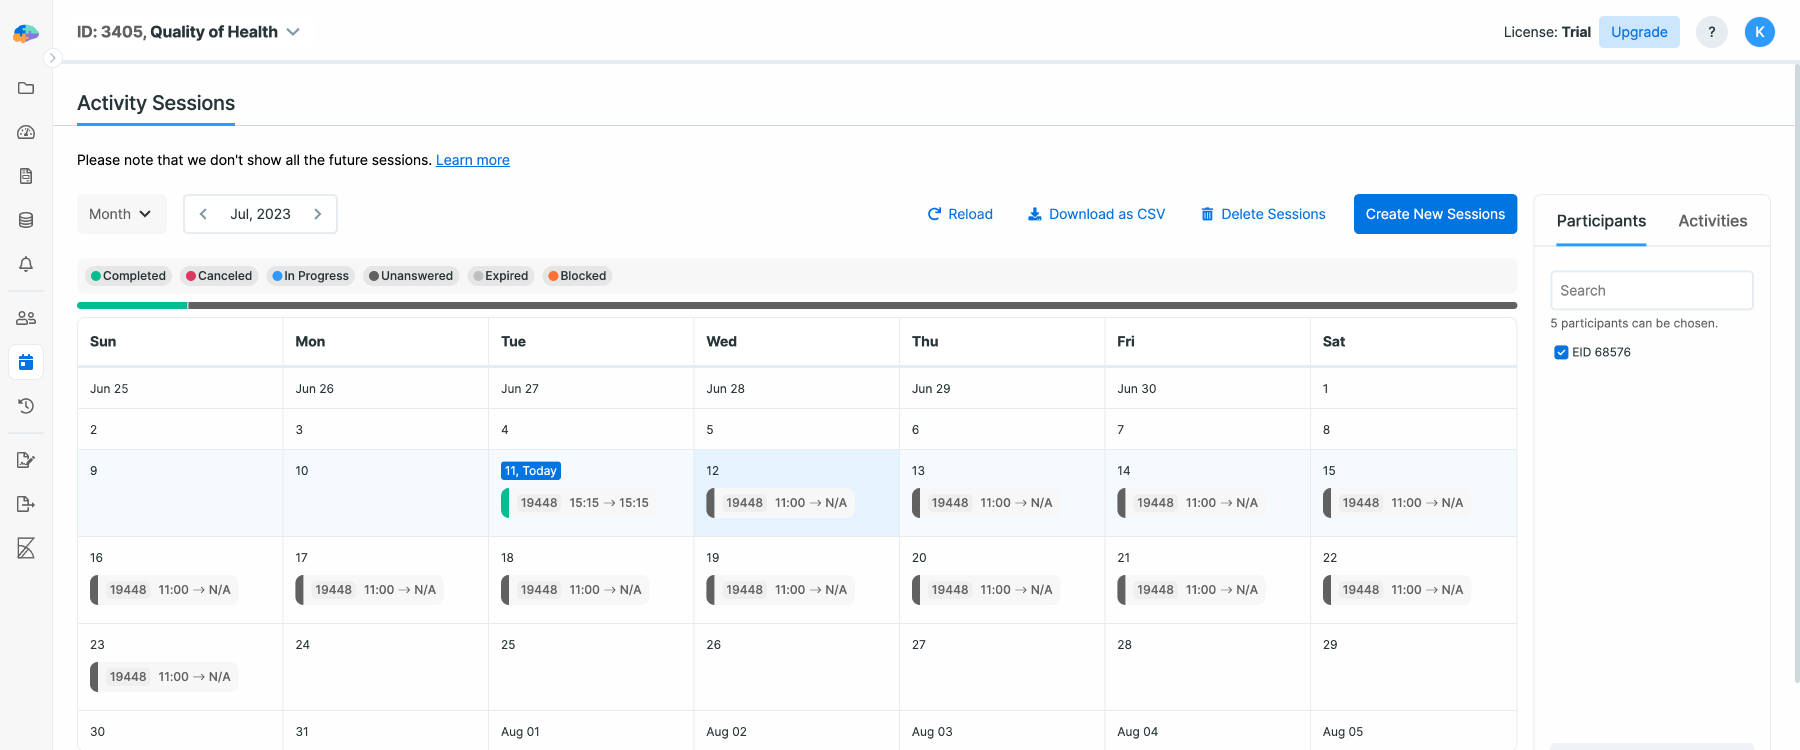
Every time you modify your survey's Triggering Logic, Avicenna updates this timetable accordingly.
Proximity Triggering Logic
You can define Surveys in Avicenna that are prompted based on a participant's
proximity to another participant, an object, or a place in the physical world.
To use this survey, your study should be configured for proximity monitoring via
Bluetooth Beacons,
as discussed here.
When you configure your study for Beacon-based proximity monitoring, you will
specify what are the Teams, Roles, and Subjects in your study. Later on,
you will use this information to configure your survey's Proximity Triggering
Logic.
Assuming you have set up that part successfully, testing your survey prompt involves configuring your beacons and placing them where appropriate, and then using your phone logged in with your participant account to come into proximity of these beacons and leave their proximity. If the phone detects a long enough proximity session with the beacon, you will receive a survey on your phone.
We suggest you check out this article on how you can investigate exactly why a given Proximity Triggering Logic survey was prompted or was not prompted on every given occasion.
Participant Enrollment
After fully testing your study, you can start enrolling participants and collecting the data. You can do that by sharing the study registration information with prospective participants and asking them to enroll in your study. In the Enrollment section, we discuss how participants can find and join your study.
You can also invite participants to your study. Participant invitation is available regardless of whether your study is Invitation-based or public. Please check the Invitation section for more details on how to invite participants to your study.
Check Incoming Data
While your study is in progress, we encourage you to use the Researcher Dashboard and check the status of your participants daily. This ensures that if your compliance drops or any issues happen, you can detect and stop it as soon as possible.
The following checklist is a good starting point on the items that you should check regularly while collecting data for your study:
- Is there any participant who has not responded to their Surveys for a long time? In this case, you may want to follow up with the participant regarding the reasons for the low compliance.
- Are sensor data uploaded at the expected rate? You can check this using the In Operation metric on the Participation page.
- What does the incoming sensor data look like? Access the sensor data uploaded by the participants and ensure they are as expected.
- What do the incoming survey responses look like? Check the responses that participants have provided since they joined the study.
Changes to In-Progress Study
In certain cases, you may need to modify your study while you have already started the enrollment. Depending on the changes, this may need an extra case to ensure the data collection for the current participants is not interrupted.
If you adjust the study's basic configuration, such as name or consent form, this will be sent to the current participants without interrupting their current participation. Similarly, changes to the data sources, including adding a new data source or removing an existing one, will be applied to the current and prospective participants without any interruption.
If you change the study's Participation Period settings, this will not impact the current participants and will only be applied to the new participants. If you want to modify the participation for the current participants, you can do so using the Modify Participation Period option on the Participation page. This change instructs Avicenna to reschedule the surveys with Time triggering logic if any. So after making this change, make sure to check the schedule for the time-triggered surveys.
If you make any changes to the survey content, the change is applied to all participants immediately after publishing the changes to the survey. If you make changes to the survey's Time Triggering Logic, that will change the upcoming scheduled sessions. In this case, you should check the new schedule as described in the above paragraph.
In all cases, don't forget to reload the device for all participants so they receive the changes immediately.