Participation Period
When a participant joins your study, Avicenna automatically calculates their participation start and end times. This represents the period during which you can present surveys and experience samplings to your participant, ask them to complete a cognitive task, or collect sensor data. Participants can always check this period so as to see how far they are in their participation using the Avicenna app.
Setting this period correctly is very important because Avicenna does not perform any data collection outside this time window.
The participation period does not have to be identical for all participants. It's common that in a study, each participant has their participation period individually. When setting up your study, you can define how this period should be calculated for each new participant. This can be done by adjusting three values, as described below.
Participation Start Time:
This refers to the time that you expect the participants to start. If you mark the Open checkbox, the participation starts as soon as the participant joins your study. If you set this to a specific date, the participation starts either on the date you specified or at the time a participant joins the study, whichever is the latter.
Participation End Time:
This refers to the time you expect the participants to end. If you mark the Open checkbox, the participation continues indefinitely. If you set this to a specific date, the participation ends for all participants on this specific date. In this case, new participants cannot join after the specified date.
Participation Duration:
This refers to the number of days you expect the participant to be part of the study. This value should be greater than or equal to 1, and cannot have decimal points. Participation duration is interpreted differently depending on the values assigned to the participation start time and end time. You can either set this to a specific number of days or mark it as From start to end using its checkbox.
Different settings for Participation Period
For each of the three values we defined above, you can either set them or check their checkboxes. This gives you eight different ways by which you can adjust your study's participation period. In this section, we explain them one by one and provide an example for each.
Check All Checkboxes
If you check all these checkboxes, it means participants will start their participation as soon as they join the study, and will remain in the study indefinitely.
Examples:
| Participant Join On | Participation Start | Participation End |
|---|---|---|
| Jun. 5th, 2020 10:15 | Jun. 5th, 2020 10:15 | Never |
| Aug. 12th, 2020 19:15 | Aug. 12th, 2020 19:15 | Never |
Setting Start, Checking End and Duration Checkboxes
In this case, if participants join prior to the specified start time, their participation does not start until the start time. If the participants join after the study's start time, as the specified start time has already passed, their participation starts at the same time they have joined the study.
The participations continue indefinitely, as no end time is specified.
Examples:
Assume the Participation Start Time is set to Nov. 15th, 2020, 10:00.
| Participant Join On | Participation Start | Participation End |
|---|---|---|
| Jun. 5th, 2020 10:15 | Nov. 15th, 2020, 10:00 | Never |
| Aug. 12th, 2020 19:15 | Nov. 15th, 2020, 10:00 | Never |
| Nov. 15th, 2020 09:00 | Nov. 15th, 2020, 10:00 | Never |
| Nov. 20th, 2020 11:45 | Nov. 20th, 2020 11:45 | Never |
Setting End, Checking Start and Duration Checkboxes
In this case, the participation starts as soon as the participant joins the study. The participation continues until the specified end time. Therefore, each participant will have a different participation duration, depending on when they have joined the study.
In this scenario, participants cannot join the study after the specified end time. If they try to do so, they will see a message saying that the study has already finished.
Examples:
Assume the Participation End Time is set to Nov. 15th, 2020, 23:00.
| Participant Join On | Participation Start | Participation End |
|---|---|---|
| Jun. 5th, 2020 10:15 | Jun. 5th, 2020 10:15 | Nov. 15th, 2020, 23:00 |
| Aug. 12th, 2020 19:15 | Aug. 12th, 2020 19:15 | Nov. 15th, 2020, 23:00 |
| Nov. 15th, 2020 09:00 | Nov. 15th, 2020 09:00 | Nov. 15th, 2020, 23:00 |
| Nov. 20th, 2020 11:45 | N/A | N/A |
Setting Duration, Checking Start and End Checkboxes
In this case, the participation starts as soon as the participant joins the study. The participation continues for the number of days specified by the Duration.
Examples:
Assume the Duration is set to 2 weeks (14 days).
| Participant Join On | Participation Start | Participation End |
|---|---|---|
| Jun. 5th, 2020 10:15 | Jun. 5th, 2020 10:15 | Jun. 19th, 2020 10:15 |
| Aug. 12th, 2020 19:15 | Aug. 12th, 2020 19:15 | Aug. 26th, 2020 19:15 |
Setting Start and End, Checking Duration Checkbox
In this case, if participants join prior to the specified start time, their participation does not start until the start time. If participants join after the start time, as the specified start time has already passed, their participation starts at the same time they join the study. The participation continues until the specified end time.
Therefore, for every participant that joins the study prior to the start time, the participation duration will be identical, equal to the duration between the start and end times. For those who join the study after the start time, but prior to the end time, the participation duration will be shorter, depending on how long after the start time they have joined. No participant can join the study after the specified end time.
Examples:
Assume the Participation Start Time is set to Oct. 15th, 2020 00:00 and Participation End Time is set to Nov. 16th, 2020, 00:00.
| Participant Join On | Participation Start | Participation End |
|---|---|---|
| Sep. 5th, 2020 10:15 | Oct. 15th, 2020 00:00 | Nov. 16th, 2020, 00:00 |
| Oct. 12th, 2020 19:15 | Oct. 15th, 2020 00:00 | Nov. 16th, 2020, 00:00 |
| Oct. 25th, 2020 09:00 | Oct. 25th, 2020 09:00 | Nov. 16th, 2020, 00:00 |
| Nov. 20th, 2020 11:45 | N/A | N/A |
Setting Start and Duration, Checking End Checkbox
In this case, if participants join prior to the specified start time, their participation does not start until the start time. If participants join after the start time, their participation starts at the same time they have joined the study. Either way, the participation will be finished by the end of Duration days, which is calculated based on the start time for each participant.
In this scenario, most participants start and end their studies at the same time, but if a participant joins a study late, they will still participate in the study for the same number of days, but they will finish their participation later.
Examples:
Assume the Participation Start Time is set to Oct. 15th, 2020 00:00, and the Participation Duration is set to 14 days.
| Participant Join On | Participation Start | Participation End |
|---|---|---|
| Sep. 5th, 2020 10:15 | Oct. 15th, 2020 00:00 | Oct. 29th, 2020 00:00 |
| Oct. 12th, 2020 19:15 | Oct. 15th, 2020 00:00 | Oct. 29th, 2020 00:00 |
| Oct. 25th, 2020 09:00 | Oct. 25th, 2020 09:00 | Nov. 8th, 2020, 09:00 |
| Nov. 20th, 2020 11:45 | Nov. 20th, 2020 11:45 | Dec. 4th, 2020, 11:45 |
Setting End and Duration, Checking Start Checkbox
In this case, a participant starts as soon as they join the study. The participation continues for the number of days specified by the Duration unless that falls after the specified end time. In this case, the participation will be cut at the specified end time.
No participant can join after the specified end time.
Note that in this case, the end time is prioritized over the duration. If the participant joins late such that the duration puts the calculated end time beyond the participation end time, the calculated end time will be capped.
Examples:
Assume the Participation End Time is set to Nov. 15th, 2020 00:00, and the Participation Duration is set to 14 days.
| Participant Join On | Participation Start | Participation End |
|---|---|---|
| Sep. 5th, 2020 10:15 | Sep. 5th, 2020 10:15 | Sep. 19th, 2020 10:15 |
| Oct. 12th, 2020 19:15 | Oct. 12th, 2020 19:15 | Oct. 26th, 2020 19:15 |
| Nov. 5th, 2020 09:00 | Nov. 5th, 2020 09:00 | Nov. 15th, 2020 00:00 |
| Nov. 20th, 2020 11:45 | N/A | N/A |
Setting Start, End, and Duration
In this case, if participants join prior to the specified start time, their participation does not start until the start time. If participants join after the study's start time, their participation starts at the same time they have joined the study. The participation ends on the sooner of start time plus duration, and participation end time.
No participant can join after the specified end time.
Examples:
Assume the Participation Start Time is set to Oct. 15th, 2020 00:00, the Participation End Time is set to Nov. 15th, 2020 00:00, and the Participation Duration is set to 14 days.
| Participant Join On | Participation Start | Participation End |
|---|---|---|
| Sep. 5th, 2020 10:15 | Oct. 15th, 2020 00:00 | Oct. 29th, 2020 00:00 |
| Oct. 16th, 2020 19:15 | Oct. 16th, 2020 19:15 | Oct. 30th, 2020 19:15 |
| Nov. 5th, 2020 09:00 | Nov. 5th, 2020 09:00 | Nov. 15th, 2020 00:00 |
| Nov. 20th, 2020 11:45 | N/A | N/A |
Time zone
When dealing with time, all Avicenna features take the proper time zone into account. This prevents ambiguity when running studies across multiple time zones, or when the participants move across different time zones while they are part of a study. Internally, Avicenna stores all time values in UTC. This ensures consistency across calculations. Then, as a researcher or a participant uses Avicenna, all time values automatically convert to the user's local time zone.
For example, if you are based on the Eastern time zone (-04:00 GMT), when you
set the Participation Start Time to Oct. 15th, 2020 00:00, Avicenna saves this
value as 2020-10-15 04:00:00-0000. But when presenting this to you on your
researcher dashboard, the value is converted to your local time zone (ET), and
therefore, it's shown as Oct. 15th, 2020 00:00.
Similarly, when a participant joins your study, Avicenna calculates their individual participation period in UTC, and then, displays this in their local time zone. In the above example, if a participant joins your study from your local time zone (Eastern Time), they will see their study starts on Oct. 15th, 2020 00:00. If they join from the Pacific time zone (PT), they will see their start time as of Oct. 14th, 2020 21:00 (as PT is 3 hours behind ET).
Manual Adjustment
You can modify the participation start and end time for each individual participant, and set them to any value necessary. Avicenna adjusts the participant's activity schedule accordingly. You can read more about how these adjustments happen in the Triggering Logic section.
In order to change the start and end time of a participant, follow the steps below.
- Go to the Researcher Dashboard, and from the left panel, choose
Participation. - In the
Participationtab, find the ID of one or more intended participants, and select them by clicking on their checkbox.
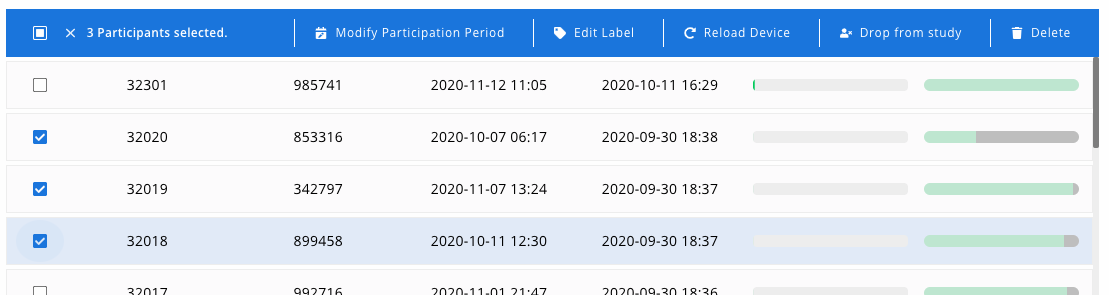
- From the menu on the top of the table, click the
Modify Participation Period. - Set a new date for the start time and end time. You can also mark the end time as Open, just similar to the earlier explanation.
- Press
Saveto apply the change.
By pressing Save, Avicenna will save the new participation period for all of
the selected participants, adjust their activity schedule, and
reload the study setting on their phone.
Participation Period Modification
You can change the values for participation start time, end time, and duration, at any time, even while the study is in the field and enrollment is in progress. Any changes will be applied to future participants. Note that the changes do not apply to the participants currently enrolled in the study. That is because Avicenna has already calculated their individual participation period, and stored that for them. If you want to change the individual participation period for the currently enrolled participants, you need to manually adjust them.
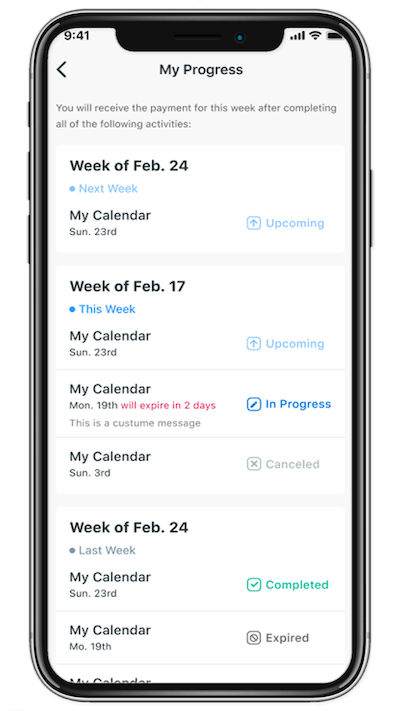
My Progress
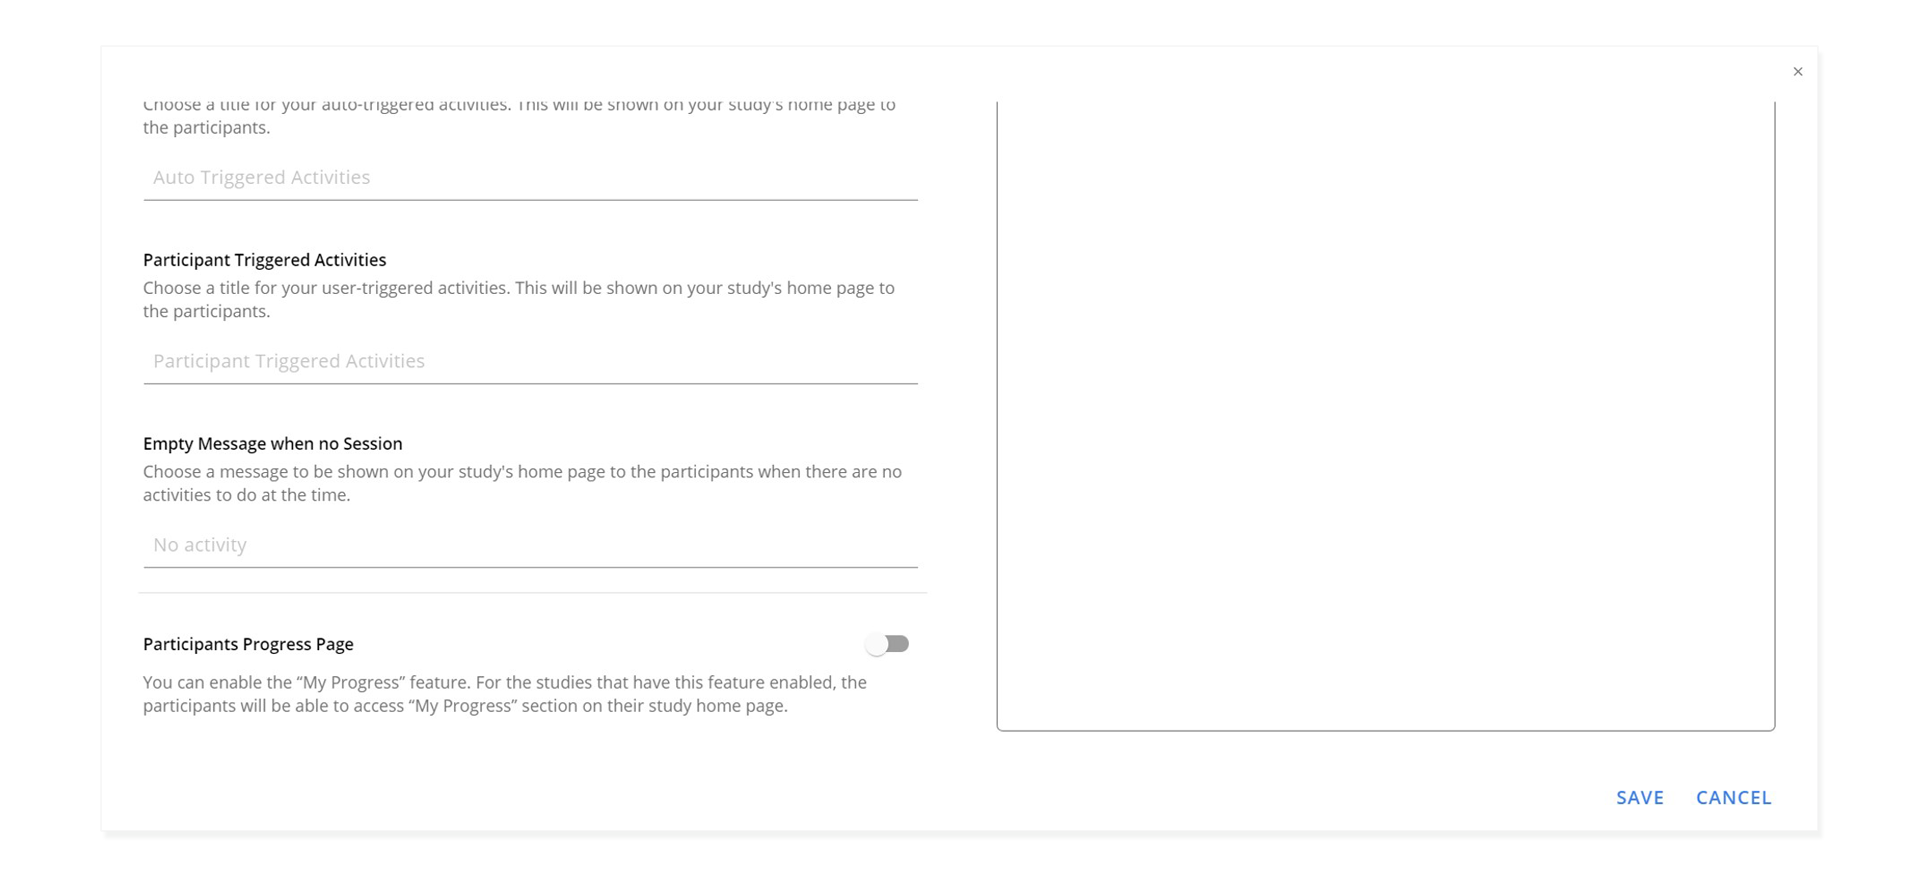
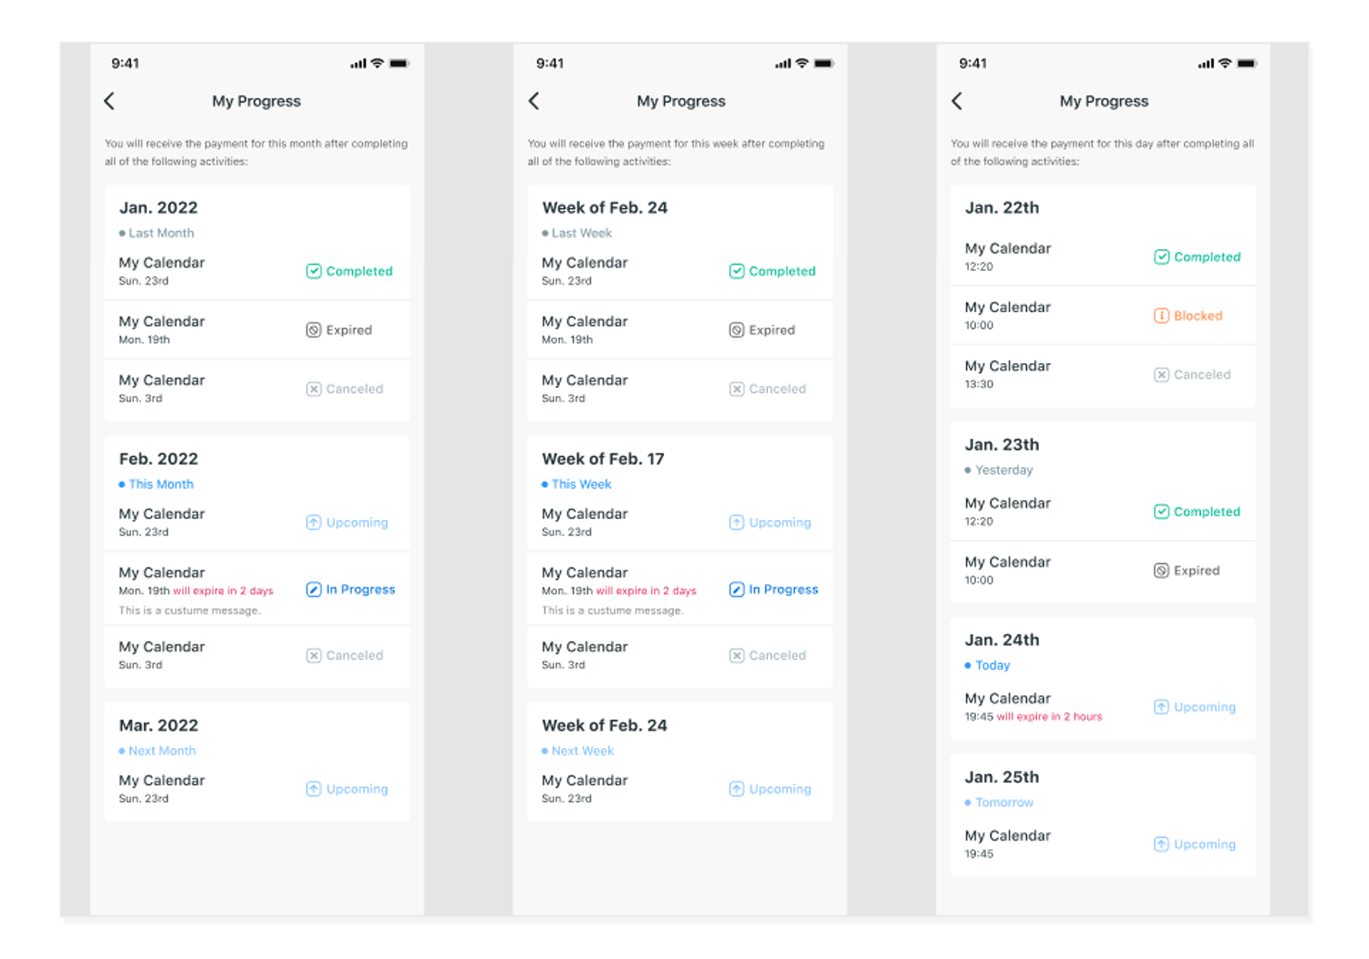
This feature allows participants to view their progress during their participation in the study. When enabled, participants will see a button on their study’s home page that allows them to open the My Progress page. This is useful especially if you want to compensate your participants for their participation or if you have a rewarding or gamification system integrated into your study. In either case, participants are able to track their progress while in the study. Activating this feature allows participants to access the My Progress page under the Optional Activities section on their study home page. When a participant taps on the My Progress icon, it presents the history of all the activity sessions of the participant followed by their status.
-e30891c974ea506aab581107ab4a2f6b.png)
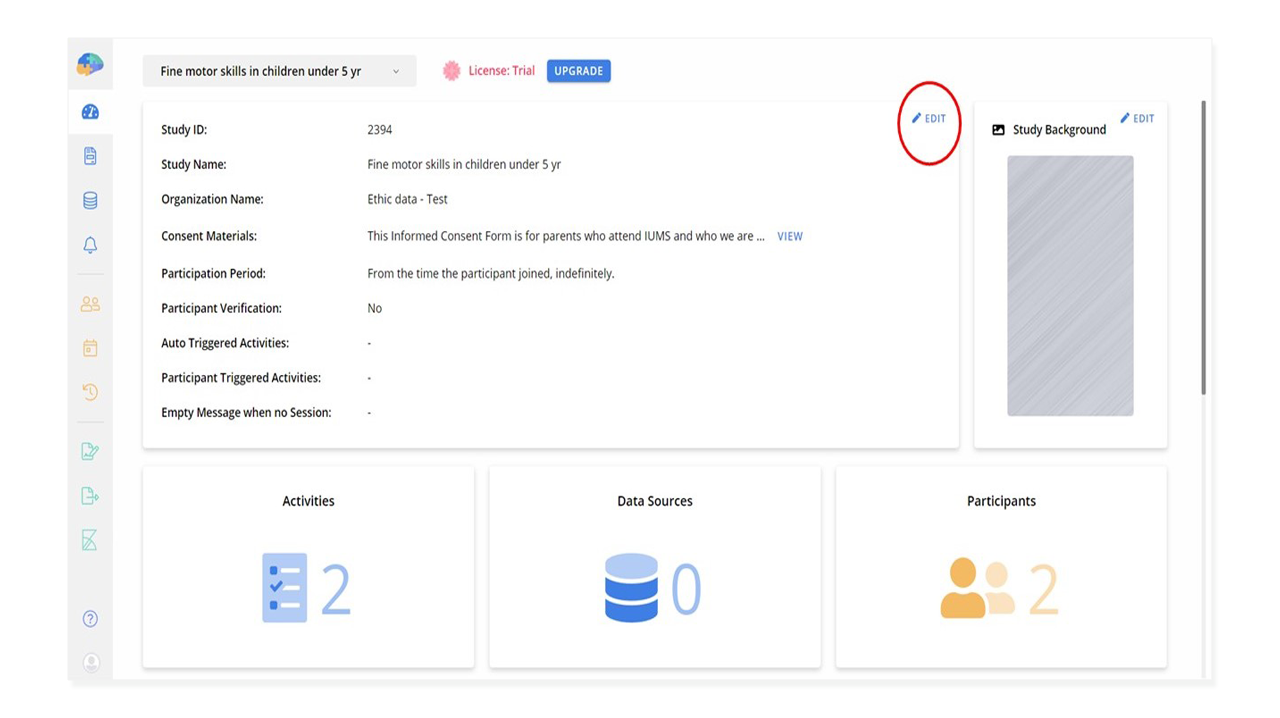
To enable this feature, go to the Basics Page of your study and press the Edit button from the top panel.
Scroll down up to the end and enable Participants Progress Page to see its properties.
Grouping
This property lets you define how the content of the My Progress page should be categorized. We provide 3 options here: Monthly, Weekly, and Daily. In the following picture, you can see 3 examples of setting this property to Monthly, Weekly, and Daily respectively from left to right.
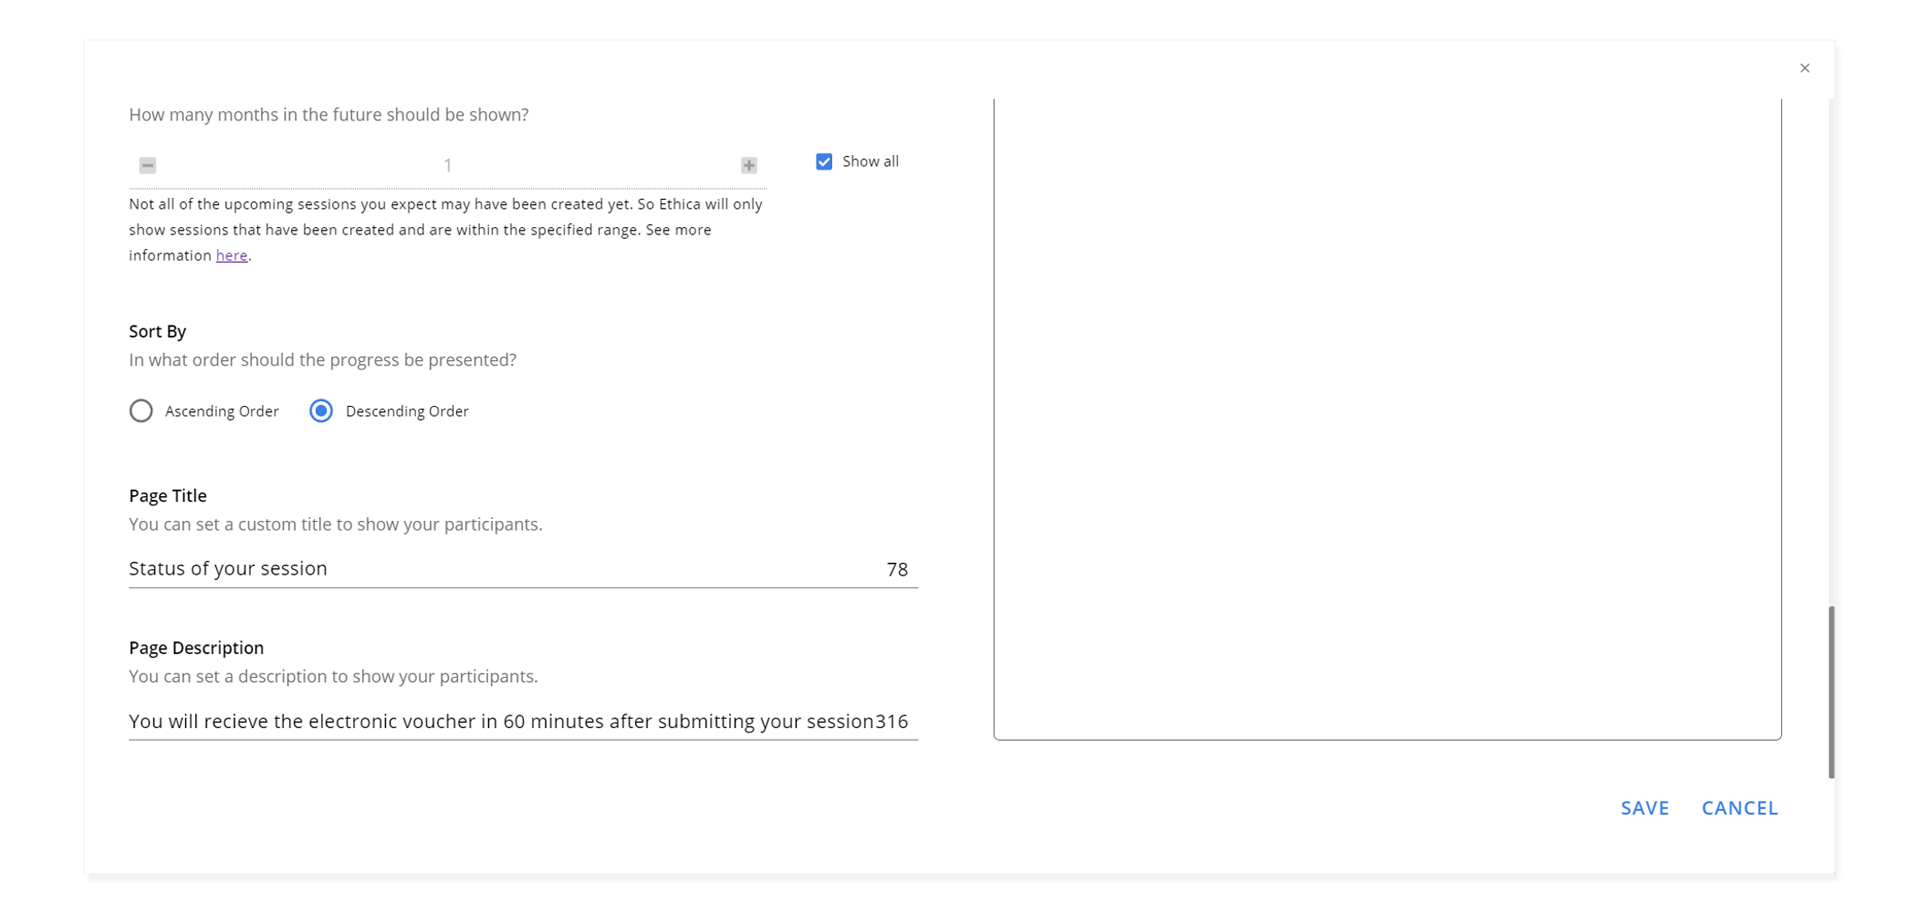
Months/Weeks/Days to be shown
This option allows you to indicate how many months/weeks/days in the past and future should be presented. Note that not all the upcoming sessions you expect may have been created yet. So Avicenna will only show sessions that have been created and are within the specified range. See more information here.

Sort By
This option allows you to set the order that which the progress should be presented.
Ascending Order
Shows the newer activity sessions first.
Descending Order
Shows the older activity sessions first.
Page Title
This is the title of the page that participants see when they open the My Progress page. By default, the Page Title is My Progress.
Page Description
This option allows you to set a description for this page which will be shown to your participants when they open the My Progress page.